Monday, July 28, 2014

Busy Bee!

Good morning! 
It's Monday morning here and we have just enjoyed a weekend of family time :) We went go-karting on Saturday. This was new for us and I've found out that I have 2 hoon daughters hehe - I felt safest watching on the sidelines. Then we went to a Mexican restaurant for tea, yumm! On Sunday we chilled at home, and I took Jessica to a birthday party - she loved the jumping castle :)

On today's scrapbook page I tried some different things to usual. I featured stenciling on my page, I used a lot of purple, and I used a photo without a person in it. It is always fun to try something new :)
I've created my background with just stencils, stamps and inks. I've used a purple, green and blue colour scheme to go with the photo - and pops of gold. The stencils are from Prima and the stamps are Prima and KaiserCraft. 
My embellishments are from D-lish Scraps. The flowers are sea green and violet Old Fashioned Roses  I've also used a white Forget Me Not, gold twine and watercolour script words flair. Across the page I've scattered some gold and purple star mini sequins (to give a random look). I dot glue next to them, then I use a Clever Sequin Pick-up Pencil to place the sequins on the glue - easy. 
Lastly I've added some gold Thickers, Studio Calico gold hearts and washi from my stash.

Thanks for stopping by
Crafty Hugs xx

Monday, July 21, 2014

Baby Me!

Winter school holidays have just finished for me - crafting and bogging have been pretty much nil for me for the past 3 weeks :( so its time for a bit of a catch up (after I finish the 35 loads of washing waiting for me lol!)

Today I have a scrapbook page to share with a photo of me as a baby - so cute if I do say so myself! I'm about 1 year old. I've kept the colours to shades of pink and am really happy with how it all turned out.

**IMAGE REMOVED FOR PUBLICATION **
 
I've created my background with just stencils, stamps and inks. I just love the result!!

I've chosen a pink, white and grey colour scheme. After considering my photo placement and general page layout I selected 3 different pink inkpads and used these with a Heidi Swapp stencils. I then used a range of stamps from Prima and Kaisercraft and a dark grey ink pad. 

My embellishments are all from D-lish Scraps. The wood veneer are Freckled Fawn Wood Chip birds, music notes hearts and houses. I've also used heaps of pink and white bitty blooms and sequins. I've scattered the sequins across the page (to give a random look) then I dot glue next to them, then I use a Clever Sequin Pick-up Pencil to place the sequins on the glue - easy.
The washi and alphas are from my stash.

Thanks for stopping by
Crafty Hugs xx

Monday, July 14, 2014

Silly Selfie!

Last week I showed you a tutorial on "painting with plastic". I've used this technique again on this page - but first I also added a bubble/circles stencil using a gel medium. 

I love this photo of Jessica and I. She loves pulling faces for the camera, such a dag :)
The papers I have used are from the Studio Calico Printshop collection - fun and fresh colours perfect for this layout! I created a title using KaiserCraft alphas.
Most of my embellishments are from D-lish Scraps. I've painted a Wooden Veneer frame with black paint and adhered it over my photo. Then I've added cream Forget Me Nots, burgundy Cherry Blossoms, blue  Cosmos Daisies and a blue rose as well as Freckled Fawn Wood Chip birds, music notes and clouds.
In the bottom corner I've added a Ticket Tab and yellow Cherry Blossom.
Thanks for stopping by
Crafty Hugs xx

Saturday, July 5, 2014

D-Lish Scraps Cybercrop Technique Challenge!

This weekend is the D-Lish Scraps 5th Birthday Bonanza and Cybercrop weekend! There are lots of amazing in store sales, cybercrop challenges and prizes to be won. 

The D-Lish Scraps Blog contains details of all the challenges. 
There is also a Facebook Event here

My Challenge is a Technique Challenge "Painting with Plastic"!!

I love to use paints on my backgrounds and I particularly love a watercolour look. An easy way to achieve this is by using plastic bags! This is certainly not my idea, I have seen this used a lot by many crafters but I thought I would give my take on it.

You will need some paints, sprays or inks (I particularly love to use watercolour pan paints - like my children use) some plastic (old plastic packaging is perfect, in a variety of sizes) and water. You will also need to apply gesso to your cardstock and let it dry.
Step 1: apply some paint to the plastic - use plenty of water
Step 2: Spray water on your gesso'd paper where you want to paint
Step 3: "stamp" the plastic onto your page and squish the paint around a bit
Step 4: lift the plastic
Step 5: repeat Steps 1-4 as necessary
Step 6: add another colour in the same way

Try experimenting with different sized plastic bags, using more/less water, using different kinds of paints or mists.

"In the Garden" is my inspiration page. I wanted the background to give an earthy muddy look to go with the gardening photos. I've also used some black paint to write my title.
I've used lots of D-lish Scraps yumminess on this page. Specifically brown bitty blooms,  a white mini PVC doilie, Freckled Fawn Wood Chip arrow paperclip and hearts and speech bubble wood veneer, a Kraft Tab, a mini peg, a black chevron bitty bag, and a shipping tag. I also made a flower out of green and pink coloured wire - it is very easy to do!
I've also stamped the date using a Pebbles roller date stamp, and a chevron stamp from the "Hello Arrows" stamp set from  Kellie Stamps.

I cant wait to see your take on this "Painting with Plastic" Technique Challenge. You have until Monday 14th July midnight AEST to upload your entries here.

All of the 5th Birthday Bonanza Cybercrop Challenges can be found here

All of the 5th Birthday Bonanza Cybercrop Challenge Link Ups can be found here
All of the 5th Birthday Bonanza Cybercrop Rules can be found here

There lots of amazing prizes to be won. There will be a prize pack for the winner of each challenge.


You can also earn "tickets" to go in the draw for the major prize!
To earn tickets in the major draw:
-1 ticket for each challenge completed
-1 additional ticket if you use D-Lish Scraps products on your challenge layout (you need to tell us what D-Lish products you use in your blog post)
-1 ticket for every $10 spent at D-Lish Scraps during the weekend (From Friday 4th July 9am AEST through to Sunday 6th July 9pm AEST)

Good luck and Happy Scrapping!

Crafty Hugs xx 

Monday, June 30, 2014

Believe in the Magic of a Dream!

I love creating backgrounds on white paper. I particularly love using mists and sprays but these can get messy and difficult to do when you have a small workspace. So I decided to try creating my background with just stencils, stamps and inks. Wow, I just love the result!!
I took my colour inspiration for this page from my photo - of my gorgeous daughter Rachael! So I stuck with a green, black and white colour scheme. After considering my photo placement and general page layout I selected 3 different green inkpads and used these with a selection of Heidi Swapp, Prima, and Studio Calico stencils. I then used a range of stamps from Prima and Kaisercraft and a black ink pad.   
I matted a number of KaiserCraft papers under my photo and on the edges and I used KaiserCraft alphas for the title. I journalled around the entire edge of the page - love this look!
Then it was time to add lots of embellishments from D-lish Scraps. Around the photo I added a white Cherry Blossom, green bitty blooms, green Polka Dot Heart Button, Journal it Tab, black cabachon Resin Flower, black Resin heart, a green sequin bow, green coloured wire, and Freckled Fawn Wood Chips hearts.
In the bottom left corner I added green bitty blooms, green coloured wire, black polkadot button, a white Forget Me Not, and Pinkfresh Navajo arrows Colourblock Wood Veneers.

Across the page I've added some green heart mini sequins. I like to scatter the sequins across the page (to give a random look) and dot glue next to them, then I use a Clever Sequin Pick-up Pencil to place the sequins on the glue - easy.

Thanks so much for stopping by
Crafty Hugs xx

Wednesday, June 25, 2014

Do You Like to eat Cannelloni?

When I initially started blogging it was all about my crafty life. I really enjoy reading about other aspects of my crafty friends lives - what they have been doing, other interests and hobbies, what they are reading of eating. So, I'm going to try and post about some of these things myself. I have been inspired by the lovely Kellie Winnell and in particular her "20 things to blog about" post here.

So today I'm sharing a recipe for Cannelloni. This is a recipe that my daughter Rachael came up with and she loves to cook it for us ... Yum!!
Ingredients:
200g dry cannelloni shells
200g feta cheese cut into 
250g ricotta
100g baby spinach - chopped finely
500g jar pasta sauce
2 cups water
Method:
- Add the chopped feta, ricotta, and chopped baby spinach to a bowl and mix well.
- Push the 1-2 tablespoons of the chess mixture into the cannelloni shells - using your fingers is best!
- lay the shells in a single layer in a large lasagna dish.
- pour the jar of pasta sauce over the cannelloni
- pour 2 cups of water gently over the top
- bake for 50 minutes in a preheated 180degC oven   
I did intend on taking more progress photos but I forgot - by the time I remembered there was hardly any left lol!

This is a popular family meal in our house :)

Thanks for stopping by
Hugs xx Karyn

Monday, June 23, 2014

Slip-n-Slide Fun!

I've been experimenting with lots of different kinds of watercolour backgrounds. Trying different ways to apply the paints/mists and with varying amounts of water. I've also started using clear gesso instead of white gesso. Often white gesso dries to an off-white colour on your page which isn't always what you want. The clear gesso is also much grainier/rougher to feel once dry.

For this page I first covered the paper with clear gesso and let it dry. I like to do a few pages at a time so you always have a page ready to work with. I sprayed my paper with water, then added drops of coloured mist (I used a blue, green and yellow from the Tattered Angels chalkboard range) from a bottle (unscrew the nozzle and add drops from the inside tube). Then I used a wet paintbrush to spread some of the colour and more water spray to disperse. Some drops I just left as is. Play around until you are happy with the result then let it dry. I find it best to let each colour dry before you add another colour. 
The papers I have used are from the Studio Calico Printshop collection - fun cool summery colours perfect for this layout! 
I've used some amazing and fun embellishments from D-lish Scraps: Freckled Fawn heart wood veneer and enamel dew drops, white blue and green bitty blooms, and Pinkfresh hearts, arrows, and envelope Colourblock Wood Veneers, and a chevron Journal Spot.
I've also used a heap of stamps from Kellie Stamps: the 2014 Summer Fun stamp set, the Shapes stamp set, and the 2013 Summer set. I added the date using a Pebbles roller date stamp. I created a title using KaiserCraft alphas.
Thanks so much for stopping by
Crafty Hugs xx

Friday, June 20, 2014

Currently Me - Weeks 20-21!

I've had so much fun working on my "Currently Me 2014" journal. It's a great way to reflect back on your interests and activities over time. I'm keeping it simple, using papers etc from mainly 1 collection, using lots of stamps, and using relatively flat embellishments. 

These pages are for the second half of May. The first photo is from my birthday - cake time! The other photo is of me cuddling a koala - it was so soft, gentle and adorable!  
Products I've used include: Kellie Stamps the Shapes, Photo Bomb and Favourite mini stamp sets; Stampin' Up! Epic Day This and That Journal, washi tape, designer series paper, and stickers; Freckled Fawn wood veneer; Studio Calico cork arrows; Currently card (free digi download) from Kristin at Rukristin.

Thanks for stopping by
Crafty Hugs xx

Wednesday, June 18, 2014

Currently Me - Weeks 18-19!

Here are 2 more pages in my "Currently Me 2014" journal - the first half of May. The first photo is of me enjoying a coffee at Bracegirdles chocolate cafe (yum!!) while on a shopping trip with my daughter Rachael. The other photo is of me at the Michael Buble concert - and yes "Bowties are cool"!! 
Products I've used include: Kellie Stamps the Tea for 2, Shapes, and Geek stamp sets and "Awesome" from the Awesome Flair set; Stampin' Up! Epic Day This and That Journal, washi tape, designer series paper, and stickers; Freckled Fawn emoticon and music notes wood veneer; Studio Calico stars and circle word wood veneer and cork arrows; Currently card (free digi download) from Kristin at Rukristin.

Thanks for stopping by
Crafty Hugs xx

Friday, June 13, 2014

Currently Me - Weeks 16 & 17!

Here are 2 more pages in my "Currently Me 2014" journal - the second half of April, and school holidays. The first photo is of me and my Grandma - she had broken her leg and was in hospital at the time (no more roller skating Grandma!!). The other photo is of my rather large "Fur baby" - I dont have time for riding at the moment but I will get back into it in the future :)
Products I've used include: Kellie Stamps the Birthday 2013, Mothers Day 2013, and Pets 2013 stamp sets and "Today" from the Awesome Flair set; Stampin' Up! Epic Day This and That Journal, washi tape, designer series paper, and stickers; Freckled Fawn arrow and heart wood veneer; Currently card (free digi download) from Kristin at Rukristin.

Thanks for stopping by
Crafty Hugs xx

Wednesday, June 11, 2014

Game Of Thrones!

I've recently become a hugs "Thrones" fan. I've always wondered what all the hype was about, and I had tried to watch an episode but I just couldnt get into it. That was until the first 3 seasons aired on Foxtel a few weeks before season 4 started. SO I watched it all from the start and although I find it a bit violent at times I just love the characters and the relationships between them and I just love watching all their wargaming tactics!!

Anyways, there was a Medieval fair that we went to at the start of May with lots of cool props and photo opportunities. We had a go at archery and watched the horses jolsting - was a fun day out!!

These are pages from May in my "SMASH*ing 2014" Journal (using the Tasty SMASH* folio). I made the calendar using MS Word. Usually I wait until the end of the month before I start SMASH*ing for the month (that is why my calendar is unfinished) but I had these photos that I had to SMASH straight away!!
Products I've used include: Kellie Stamps Birthday stamp set; Studio Calico cork arrows; Jillibean Soup Alphas; and washi from my stash.

Thanks for stopping by
Crafty Hugs xx

Friday, June 6, 2014

Loosing First Tooth!

Some more pages from March in my "SMASH*ing 2014" Journal (using the Tasty SMASH* folio). Jessica lost her first tooth! It was a momentus occasion. 2 days before her 6th birthday (and school photos lol). There were tears, as well an exciting visit from the tooth fairy who delivered a shiny gold coin!!

These pages are very simple - I just loved these background pages and couldnt cover them up. 
I've also used an Amy Tangerine diecut; Studio Calico speech diecuts and cork arrows.

Thanks for stopping by
Crafty Hugs xx

Wednesday, June 4, 2014

SMASH*ing 2014 - April!

Today I have some more pages to share with you from April in my "SMASH*ing 2014" Journal (using the Tasty SMASH* folio). There are some fun Easter photos here. Jessica made baskets for the Easter Bunny - I thought it was a huge joke to give dad a tiny bottle top for his basket, but that didnt stop him from eating/sharing all of our eggs lol!
Products I've used include: Kellie Stamps  you are the best, magical, Easter 2014 stamp sets; Amy Tangerine die cuts; Studio Calico wood veneer birds and cork arrows; Freckled Fawn wood veneer house and emoticons; Heidi Swapp word sticker; Pebbles roller date stamp.

Thanks for stopping by
Crafty Hugs xx
Monday, June 2, 2014

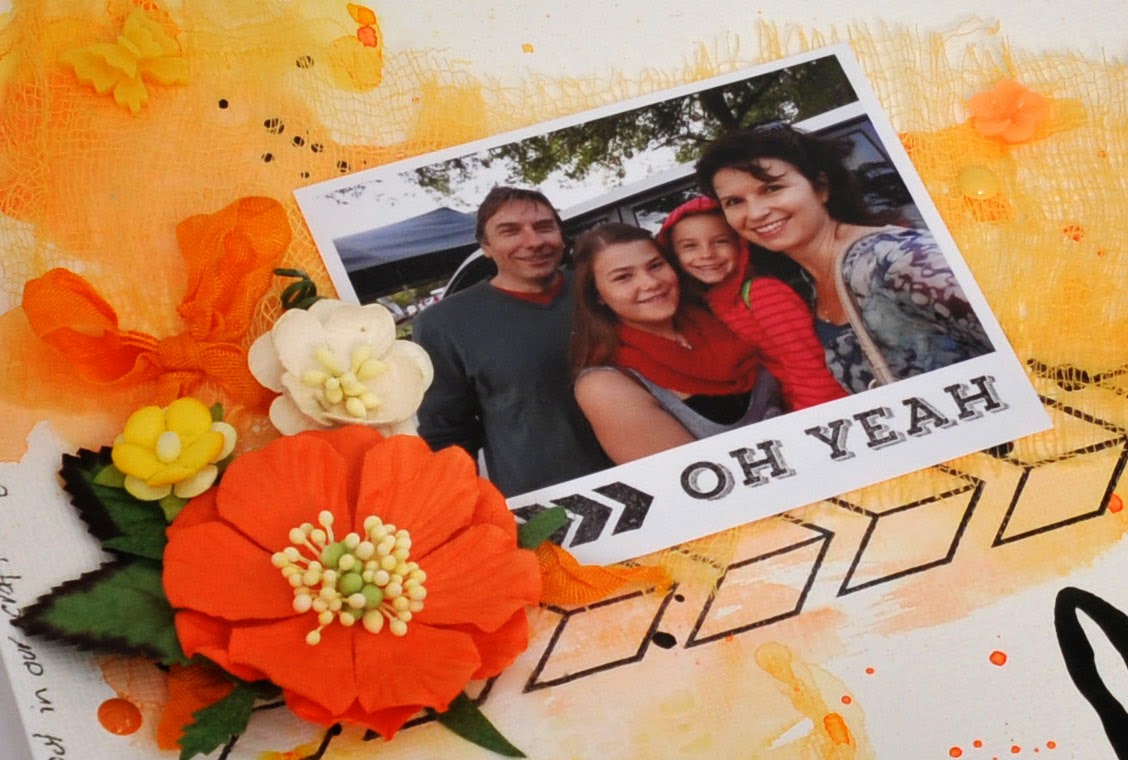
Life Is Good!

I always like to try different things with my scrapbooking. Lately I've been trying to include more of my handwriting on my pages. I dont particularly like my handwriting but I love the unique and special effect it brings to a page. So as well as hand journalling around the entire edge of my page I also hand wrote the title. 

I started with a white page that I covered with gesso. Then I painted and splattered yellow and orange Dylusions ink sprays to create the background.
Once it was dry I journalled around the edge using a black SMASH* pen. After considering my photo and embellishment placement I added a variety of arrow stamps across the page and below my photo. The stamps I used were the Kellie Stamps "Oh Yeah" wood mount stamp; and the arrows from the Hello Arrows stamp set. I also added the date using a Pebbles roller date stamp - I actually have lots of roller date stamps but this simple one is my favourite!! 

At this point I also painted my title. I practiced a lot on scrap paper but it never works out quite like you intend it to - that makes it unique right!! I used black gouache paint mixed with water. This paint mix was also good to splatter across my page.   
Next was the fun part - embellishing with lots of D-lish Scraps yumminess! I added yellow Forget Me Nots, a white Cherry Blossom, large orange wild rose, apricot Hand dyed muslin, orange Hand-Dyed Seam Binding, yellow cabachon Resin Flower, and yellow Resin Butterflies, and some Freckled Fawn enamel dew drops. 
I also added an Amy Tangerine flair and twine from my stash.

Thanks for stopping by
Crafty Hugs xx

Friday, May 30, 2014

Roller Skating!

During the recent school holidays my daughter Jessica tried roller skating for the first time. It was very tricky and she fell over lots but she kept smiling and kept picking her self up and having another go - I was so proud of her!!

These are pages from April in my "SMASH*ing 2014" Journal (using the Tasty SMASH* folio). I made the calendar using MS Word - I love to record our monthly activities this way!
Products I've used include: Kellie Stamps "Nailed It" and "Like a Boss" wood mount stamps and the camera stamp from the picture perfect stamp set; Amy Tangerine die cuts; Studio Calico wood veneer house and cork arrows; Freckled Fawn wood veneer hearts; Heidi Swapp butterfly and word stickers; Jillibean Soup Alphas; Pebbles roller date stamp.

Thanks for stopping by
Crafty Hugs xx