Thursday, September 26, 2013

SMASH*ing July!

I've been using a 365 SMASH* folio as my 2013 SMASH*book . I love that at the end of the year I can look through the one book and get a glimpse of our life during the year.

I allocate six pages per month. On the first page for each month I include a calendar of the month (I create it in MS Word then print it out) and I write in the daily highlights with coloured pens. 

Today's SMASH* pages are for July and are made using the gorgeous September '13 Gourmet Tart kit from Lime Tart. The photos are from the last school holidays when we stayed in Adelaide and went to the movies.


I used the MME Cut and Paste papers from the kit and cut some strips, punched some circles, and fussy-cut around some of the flowers. I've also added a heap of the Crate Paper Party Day die-cuts, MME label stickers and a Studio Calico calendar journal card on the pages (all from the kit).


Finally, I've added a paperclip, wood veneers, and electronic diecuts from my stash and used some stamps and date stamp. 


In addition to the Gourmet Tart kit I've used Studio Calico flower, shapes and camera wood veneers; Freckled Fawn heart wood veneers; Kellie Stamps "MY DAY" stamp from the Thrifted stamp set, "INSTAmoment" and "Holiday" from the Favourite stamp set, "Movie Night" from the Just for you stamp set, and "selfie" from the I Made This stamp set; Stampin' Up! ink; Pebbles roller date stamp; and a paper-clip from my stash. I've used my Silhouette Cameo to cut the polaroid frame, today tag, and arrows.

Thanks so much for stopping by
Crafty Hugs xx

Thursday, September 19, 2013

We Are Happy!

Last week I gave a bit of an introduction as to what SMASH*ing means to me and I showed you how I added interest to a plainer SMASH* page using paints. This week the foundation SMASH* page I used was quite the opposite - it was super busy!

I didn't take a photo of the page before I started but hopefully you can see well enough. This was probably one of the busiest SMASH* pages I've come across - but that is what I just love about using SMASH* folios. Every page is different. Some are plainer with just some grid lines, other pages are white with images and words, others are simply coloured, and some are works of art that I don't want to cover at all! Some people prefer to completely cover a page they don't like, some people rip it out, but I like to go with the flow and work with it - let the quirkiness shine through!

Today's SMASH* page is made using the gorgeous September '13 Gourmet Tart kit from Lime Tart. It contains a photo of my amazing hubby and I at brunch one day :)


The page is in my 365 SMASH* folio. I've added some white paper doilies underneath my photo and embellishments to separate them from the busy background. I've used a heap of the Crate Paper Party Day die-cuts and MME label stickers from the kit on this page.


Finally, I've added a paperclip, flower, wood veneers, tag, bag & twine from my stash and used some stamps and date stamp.


In addition to the Gourmet Tart kit I've used Studio Calico chevron and camera wood veneers; a Prima flower; Freckled Fawn heart wood veneer; Give A Girl A Stamp "we are happy" stamp from the Currently mini stamp set; Stampin' Up! ink; Pebbles roller date stamp; and a paper-clip, tag, bag, twine and doilie from my stash.

Thanks so much for stopping by
Crafty Hugs xx

Thursday, September 12, 2013

SMASH*ing with Lime Tart!

I just love SMASH*ing. For those of you that don't know what SMASH*ing is, let me elaborate - or my version of it anyway! I first heard of SMASH* folios about 2 years ago. They are made by K&Company and the pages in the folios are already patterned - each page is different. I watched this youtube clip and was immediately hooked. SMASH*ing has no rules. You can use the folios like a journal and write in them, you can paste in magazine articles, attach movie tickets or wedding dress fabric - whatever you like! 

I'm more of a SMASH*booker - sort of a casual version of scrapbooking in a SMASH* folio. I like to include photos but I also like to include mixed media and lots and lots of embellishments (flatter ones mainly or the book gets too thick too quick!). My pages are much more informal than my scrapbook pages and my aim is to SMASH* much quicker than I would scrapbook. I also tend to SMASH* items, photos and memories that I would not normally scrapbook. I don't tend to layer lots of papers on my pages, but I do like to use paper strips, die-cuts and punched shapes. The pages in the SMASH* folio's are already patterned so I generally like to feature this. If I really don't like a pattern on a page then I cover it up. 

I will share more of my thoughts and tips on SMASH*ing over the coming weeks.

Today I would like to show you a SMASH* page made using the gorgeous September '13 Gourmet Tart kit from Lime Tart. This is a new range of kits that Lime tart is offering with lots of fun goodies for SMASH*ing (or any of your papercrafting really!).

The photos on this page were taken when we went out to brunch with my parents. We don't get many opportunities to catch up so this was a special moment!


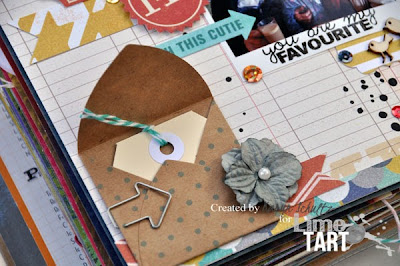
This is a page in my 365 SMASH* folio. I'm using it as a 2013 SMASH*book and I do 6 pages to a month. This particular page was relatively plain so I started by splattering some paint across the page.


I used the MME cut and paste papers and cut some strips and punched some label shapes. I layered these strips and a heap of the Crate paper Party Day die-cuts under the photos and at the top and bottom of the page. I attached a Maya Road envelope to the bottom of the page to hide my journaling tag, some MME label stickers and a SRM tiny calendar for June (all from the kit). 


Finally I added a journalling tag, a stamp, a flower, some wood veneer, arrow paper clip, sequins and twine from my stash. 


In addition to the Gourmet Tart kit I've used Studio Calico quote and bird wood veneer; Prima house wood veneer and flower; Give a Girl a Stamp "you are my favourite" from the Thrifted set; Stampin' Up! ink, label punch and arrow paper clip; and a tag, twine and sequins from my stash.

Thanks so much for stopping by
Crafty Hugs xx
Karyn

Monday, September 9, 2013

My Cutie Book Week Mermaid!

Last week I purchased one of the gorgeous "Citrus Breeze Just add paper kits" from D-lish Scraps. I love the colour scheme and the embellishments are all so fun. As soon as it arrived I just had to have a play and decided to join their September Inspiration Board challenge.

I had this photo of my "Cutie Patootie" daughter dressed as a mermaid for her Book week parade and the colours suited perfectly. I've pretty much followed the challenge sketch provided and added some of my trademark paints, mists and stencils.


The kit included the washi, coloured doilies, flair, resin flower, twine, flowers, velum pocket and journal card. I've used A Heidi Swapp heart stencil & Chalkboard mist; Studio Calico wood veneers; Stampin' Up! white & blue cardstock; Pebbles roller date stamp; D-lish scraps sequin stripand I've used my Silhouette Cameo to cut out the polaroid frame.

Thanks so much for stopping by
Crafty hugs xx

Thursday, September 5, 2013

Quick Cards!

Today I would like to show you a few quick cards I made using bits and pieces from the gorgeous Nov '12 Half Tart kit from Lime Tart.

On these cards I used some rolled roses I made myself. This is a great way to create embellishments that coordinate with your project.
Firstly I punched a variety of circles and scallop circles from the papers.
Then I cut a spiral pattern from the outside to the inside of each circle. The thicker the spiral the taller your flower will be. 
Then I used my tweezers and rolled the rose from the outside to the inside. 
Finally add a dob of glue on the base in the inside and hold until it is set.


I've kept the card design quite simple, letting the beautiful papers take center stage! I've added some strips of paper across the cards and a tag punched from the patterned papers. Then I've grouped 3 of the rolled roses with some diecut leaves. All of the papers and roses have had their edges inked and I've stamped a birthday sentiment on the reverse side of two of the cute craft tags in the kit. Lastly I've added some pearls from my stash.


In the kit there was also a cute flower embellishment so I made another card, of similar design, with this flower.


This is a great way to make 3 different yet similar cards quickly!

In addition to the kit I've used a Magnolia rose leaf die; Stampin' Up! sentiment stamp, ink, die, green paper and punches; KaiserCraft pearls.

Thanks so much for stopping by
Crafty Hugs xx
Karyn