Thursday, April 30, 2020

Art Creative Friendship - With Scrapping Clearly!

Hi Lovelies!

Today I have a page in my Art Journal that I created using lots of fun products available at Scrapping Clearly!


This was a page I created for the recent cybercrop where I was Inspired by the creations of Emma Zappone. In particular I was inspired by the fact that she doesnt use photos and she often leaves lots of white space.

I've used cotton rag watercolour page in my 8x10 Dina Wakley Media Journal. I started by adding some Colour Blast inks to the page


Next I added stencilling using Colour Blast Pastes. I've kept my colour palate in greens and blues to coordinate with the picture I chose, and added highlights of orange.


Here is my finished page.


I found the picture on Pinterest and printed it out on photo paper. I've matted some old book paper under 2 corners of the photo. 


I've added Tim Holtz wings and Tim Holtz small talk word stickers. I've added doodling around the edge of the page and the word stickers using a Fude ball pen


Thanks so much for stopping by!

Crafty Hugs xx


Monday, April 27, 2020

All About Green - With Bee Arty!

Hi Lovelies!

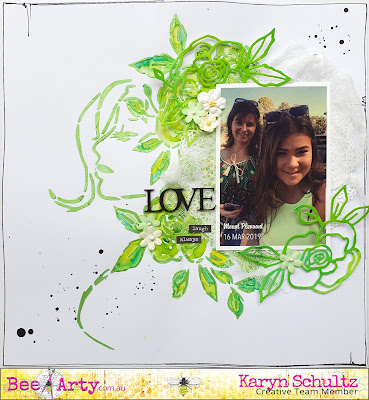
Today I have a scrapbook page to share with you made using lots of amazing products from Bee Arty.
 

I'm also joining in with the April Creative Challenge "Monochromatic". We would love for you to join in on the challenge and be in the running to win a $30 online store voucher!


For my background I have started with a sheet of 12x12 white cardstock and applying Apple Of My Eye Colour Paste through the My Lady A4 stencil

Next I took a sheet of A4 white cardstock and used Colour Artist inks in Grass, Lime and Mermaid to create a colour wash over the page. Once this paper was dry I created a number of diecuts using the My Flower metal die

Once the stencilled image was dry I used the same Colour Artist inks in Grass, Lime and Mermaid to colour the image.


Here is my finished page.


Underneath my photo I've added a white paper doilie and some white muslin as a mat. 


I've also added some of the flower diecuts around my photo as well as some paper flowers.


I've added a chipboard word painted in soot Colour Artist ink, and some word stickers. Lastly I've added a few splatters of soot Colour Artist ink.


Thanks so much for stopping by

Crafty Hugs xx


Thursday, April 23, 2020

Find Possibility - Art Journalling With Scrapping Clearly!

Hi Lovelies!

Today I have some pages in my Art Journal that I created using lots of fun products available at Scrapping Clearly!


I've used my small Dylusions journal and I started by using my Art-By-Marlene Bold and Bright watercolour pan paints to create a watercolour waterwash background. I also added splatters of the same colours.


Next I added some DWM collage tissue paper and attached using a matte gel medium.


Next I added some die cuts created using Art-By-Marlene collage paper No5 and Art-By-Marlene borders metal die.


Some background stamping was added.


Here is my finished page. I've also added some coloured muslin, black cotton thread, Tim Holtz wings, cotton and Tim Holtz small talk word stickers. I've added doodling around the edge of the pages using a Fude ball pen


Here are some close ups of my pages.


Thanks so much for stopping by!

Crafty Hugs xx


Thursday, April 16, 2020

Tag Journal Part 2 - With Scrapping Clearly!

Hi Lovelies!

Today I have part 2 of my tag journal that I created using the Art-By-Marlene Tag Journal Kit and other new Art-By-Marlene products available at Scrapping Clearly


In my last post I provided details on how I constructed the journal and decorated the cover and the first inside pages. This post covers the remaining 4 openings in the journal.

For these pages I have used my Art-By-Marlene Bold and Bright watercolour pan paints to create the background. I've used mainly teal colours with highlights of green. I've also coloured some muslin and painted some DWM Scribbly Fishes stamped images in the same colour.


Next I added some stenciling using an Art-By-Marlene stencil and teal ink.


Here is my finished pages. I've also added some stamping using Art-By-Marlene Exclusive textures stamp set , Art-By-Marlene word stickers and outlining using a Fude ball pen


For the next "Blue" pages I have used my Art-By-Marlene Bold and Bright watercolour pan paints to create the background. This time I first did a light waterwash with blue all over the pages. When it had dried I added some painting with plastic and splatters to intensify the colour in some places.


I've also painted some DWM Scribbly Fishes stamped images in the same colour and added to the page.


 I've used a similar process to create the purple pages.


Here is my finished pages.


 And lastly my yellow pages!


Thanks so much for stopping by!

Crafty Hugs xx


Monday, April 13, 2020

Love This - With Bee Arty!

Hi Lovelies!

Today I have a scrapbook page to share with you made using lots of amazing products from Bee Arty!


I wanted to use some papers from the Follow your dreams collection so I selected Bee Arty Colour Blast products in pink, purple and a touch of lime and black.

I usually like to use white cardstock for my backgrounds but I was running low so I sorted through some old patterned papers and found this one in white with black patterns. I would usually paint straight on to the paper but this paper absorbed the ink straight away (lucky I started under where I wanted to put my photo!), so I added a layer of clear gesso. You could use white gesso of you preferred.


I created a background by painting with plastic/watercolouring with the Colour Artist inks in Slipper and Berry - make sure you dry between each colour. Then I added splatters of each ink colour, as well as splatters of Lime Colour Artist ink, and Midnight Colour Shimmer Dust mixed with water.


Let this dry completely than add Fire Engine Colour Paste through the On Point stencil in places across the page.


Next I added some stamping using the Geo Grunge stamp set from the 365 collection.


 Here is my finished page. I chose a photo of me on a rare Date Night - enjoying an Espresso Martini!


I've matted my photo on elements cut from the Believe and Shine papers from the Follow Your Dreams collection. At the bottom of my photo I've added a black paper die cut created using the String Wreath Metal Die. I've also added paper flowers, muslin coloured with Slipper Colour Artist ink, and a word chipboard embellishment coloured with Midnight Colour Shimmer Dust mixed with water.


Along the RHS of my page I've added an embellishment cluster using more flowers, paper strips cut from the Believe and Shine papers, word stickers, a metal embellishment and another black paper die cut created using the String Wreath Metal Die.
 

A similar embellishment cluster is at the top left corner of my photo. 


Thanks so much for stopping by

Crafty Hugs xx